


Because of the nature of the spectrum analyzer in our ears, what we perceive as pitch or tone (at least to a first approximation) maps directly to the frequency of pure sine waves. The frequency of a wave is simply the rate at which it repeats. A pure sine wave is a wave that only has one component pitch, and no overtones. All possible waveshapes can be created by combining multiple (perhaps an infinite number) sine waves with different amplitudes and phases. Most musical waves (and to a lesser extent speech) are composed of harmonic waves — waves composed of a definite fundamental tone and partial overtones that are integer multiples of the fundamental pitch (these are called harmonics). The timber of the sound is controlled by the relative levels of the overtones.
So, basically, we now understand that the timbre of a sound is (mostly) characterized by its amplitude as function of frequency. This amplitude will also change with time, and the amplitude as a function of time may be different (and probably will be) for each different frequency in the sound. This is why the timbre of a sound changes over time.
To make this more concrete, think about how a single note on a piano changes over time; when the note is first struck, in addition to the tonal part, it also has an impulsive part — the strike of the hammer on the string. This is called the attack, and there are many frequencies represented — both harmonic and non-harmonic components. The non-harmonic components quickly die away because they are not supported by the resonance of the stretched string. The note then enters the sustain phase, where it is almost completely composed of the fundamental tone and its overtones. The shape of the amplitude of the overtones is characteristic of the piano, and is what makes it sound like a piano. As the sound begins to decay, it turns out that the higher overtones decay away faster with time than the lower overtones. So, as the note sustains, the overall volume decreases and the timbre becomes darker, eventually becoming something close to a pure tone (although the overall volume may be so low at this point that it is hard to hear). Now a piano is actually more complex than this; energy may actually move from one overtone to another during the decay, and this is a big part of the beauty of the instrument.
The original equalizers were invented for telecommuncations applications. The problem was that when you drive a long, long wire with the analog signal from a telephone, there are frequency dependent losses in the signal; the cable attenuates the high end more than it does the low end. As a result, the telephone signal was rolled off at the other end of the cable making it sound very dark, and potentially difficult to understand. Since the cable changed the frequency content of the signal, a circuit was devised to equalize the levels as a function of frequency. Thus the term “equalizer”. In fact this was done as a pre-equalizer, where the high-end of the signal was boosted before the signal was sent across the cable, as this approach did not require the amplification of high-frequency noise at the far end of the cable.
This approach to equalization is still an important application of the equalizer today; for example, this is precisely how equalizers are used in the system control units in live sound reproduction systems; an EQ is constructed so that when the pre-Equalized signal is processed by the acoustic environment of the venue, the net effect is to have a (relatively) flat response as a function of frequency in the room.
In the text above, we described how the timbre of an instrument or a voice was (mostly) characterized by its amplitude as a function of frequency. So, if we wish to change the timbre of a signal (instrument, voice, whatever), the first place we are going to want to start is by changing the amplitude as a function of frequency. This is precisely what an equalizer does. But instead of using it to equalize the overall response of a system, we are going to use it to make creative changes to an instrument, a voice or an entire mix.
The original equalizers used for this purpose were so-called “Tone Controls.” These were usually composed of three fixed bands:
 Low Shelf Filter |
 Presence Filter |
 High Shelf Filter |
The bands all overlapped, and you could adjust the gain on each band to boost or cut the low end, mid-range, or high end, respectively. The thing is — that does not provide a lot of control. Sometimes the range of frequencies you want to change is quite narrow; and often the center of the range that you want to change is not where the center of the EQ band is. Early British made commercial mixing consoles added another band, and the design had a very nice set of center frequencies and bandwidths; this was the so-called “British EQ” and was very useful for music production, but still lead to the situation where sometimes you could not quite get the EQ that you needed to adjust the timbre as you desired. This fact lead to the invention of the Parametric EQ.
The parametric EQ provides independent parameters for the center frequency, the bandwidth and the boost or cut of the EQ band — thus the name “Parametric” EQ.
Modern EQs are either partially-parametric or fully-parametric. A partially parametric EQ has one or more bands of parametric EQ with additional bands that are fixed function as shelves or high and low cut filters. A fully-parametric EQ, like the ones in ChannelStrip and the MIO+DSP package have fully parametric bands for each available band in the EQ. Any band can be made into any filter type, and all bands have full parametric range for all the parameters. This makes the EQ very flexible.
Perhaps it would be a good idea to explain what the different filter types are. There are a number of standard filter types that are available in a fully parametric EQ:
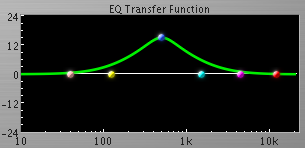
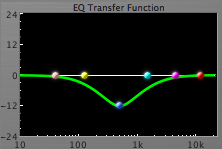 Peak Cut Filter |
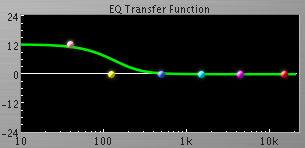
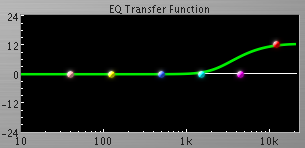
 High Shelf Filter |
 Low Shelf Filter |
 High Cut Filter |
 Low Cut Filter |
 Band Pass Filter |
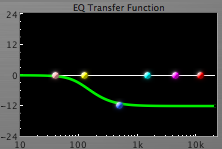
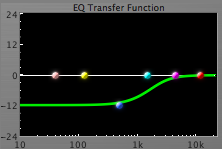
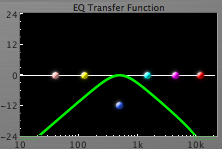
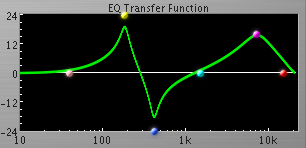
The Peaking (or presence) filter is the original “parametric” EQ filter type. It allows you to boost or cut a range of frequencies around the frequency that you specify, by the amount that you specify. The boost or cut will be the amount that you specify at the center frequency and will taper back to no change on either side of the center frequency. The bandwidth (or Q) parameter controls how quickly it will taper back to no change. Since the EQ in ChannelStrip automatically graphs the change in amplitude as a function of frequency as you change the parameters, you can quickly get a sense of what the various parameters really mean by enabling one band in the EQ, changing the parameters and watching how the response graph changes. Some Peaking filters (like the ones in ChannelStrip) become quite resonant when you set the gain high. This can be used quite effectively to create resonant sounds where they were originally missing from the recorded sound. Check out the Drum tuning example below for more info.
The Shelving filters (High and Low) are characterized by adjusting the amplitudes of all the frequencies above (or below in the case of the low shelf) the characteristic frequency that you set. The gain (or cut) is applied as you set it. Below the characteristic frequency you set (or above in t the case of the low shelf), the gain tapers back to no change. On the ChannelStrip EQ, the bandwidth control adjusts the slope of the shelf, and the amount of peak and dip exhibited at the transition. Again, the best way to understand this is to play with the ChannelStrip UI and look at the graph as you change the parameters.
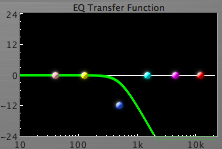
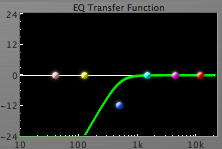
The High and Low cut filters simply attenuate the frequencies above (or below for the low pass case) the frequency you set. The gain and bandwidth have no effect on these filter types. Some EQs allow you to control the slope of the cutoff, but the filters in ChannelStrip don’t have that kind of control available. If you need to make the cut-off steeper, you can stack multiple bands at the same frequency. Low cut filters are useful for removing DC and rumble. High cut filters are often useful in side-chains and to control the high end of signals. That being said, often high shelf filters are more appropriate for adjusting the high-end timbre of a signal.
The Band pass filter is a combination of the High and Low cut filters. This kind of filter attenuates the frequencies both above and below the band that you have selected. The frequency control selects the center of the band that is allowed to pass through the EQ, and the bandwidth controls, well, the width of the band that is passed. This type of filter is often used in a dynamics processor sidechain to limit the range of frequencies that the processor detects.
If you check out a variety of recording books, magazine articles, and websites, you’ll find a myriad suggestions about the frequency ranges of different instruments and timbres. When you get to work with your tracks and your EQ, you’ll find out that most of them are wrong, or don't tell you the whole story. It is very difficult to characterize the precise nature of what frequency range corresponds to what timbre. You’ll find (as you gain experience) that it is often the relative balance of frequencies that count; sometimes it is better to cut the midrange than to boost the highs. Experimentation is key; starting from the presets in ChannelStrip is a great way to learn how to configure the EQ to achive specific goals. You will often find that the preset will get most of the way there — then tweak the parameters to dial in the result you are looking for.
As we said above, it is very difficult to provide rules of thumb about frequency ranges and timbres. The most effective way we have found to zero in on the critical frequencies and the building blocks of the timbres you are working with is to use a tool like SpectraFoo to look at the spectral structure of the tracks and mixes you are working with. Since SpectraFoo shows you the evolving timbral structure synchronized with the audio you are listening to, you can quickly learn and identify the aspects of the sound that you want to enhance or decrease.
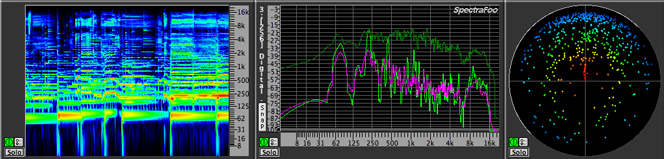 Example SpectraFoo Instruments |
One thing that you will quickly find as you begin to mix multiple instruments is that quite often individual instruments will sound great by themselves, but when you mix them together, they tend to obscure each other. One of the trickiest aspects of mixing is figuring out how to create a “space” in the mix for each of the instruments and voices. Often you can create space by panning the elements. But sometimes you find that the frequency overlap of the elements makes both elements muddy or indistinct. This will often happen between bass and drums or between guitar and vocals. In these cases, you can often use EQ to carve holes in the spectrum of one or more of the overlapping elements to make room. While the EQ may make each element on its own sound worse, the combined mix sounds better. Again, a tool like SpectraFoo can be incredibly helpful.
Here are some example drum tracks that show a kick drum and snare drum that have been "re-tuned" with the channelStrip Plugin:
|
Kick Drum before "re-tuning" |
Kick Drum after "re-tuning" |
|
Snare Drum before "re-tuning" |
Snare Drum after "re-tuning" |